
MacGyver Networking

When working in security consulting, you often need a lot of complicated networking setups that are a bit difficult to figure out without some knowledge of some basic Linux networking tools. I’m going to outline a few tools I use for networking setups and then show some ways to use them together for various networking setups. What follows might not be optimal (hence MacGyver), but will typically work. My standard toolbox for networking, in no particular order, includes:
iptablessshsocatncadbwhere available (this is on more than just Android these days)
These tools are often all you’ll need to handle some specific networking task.
Tool overview
iptables NAT
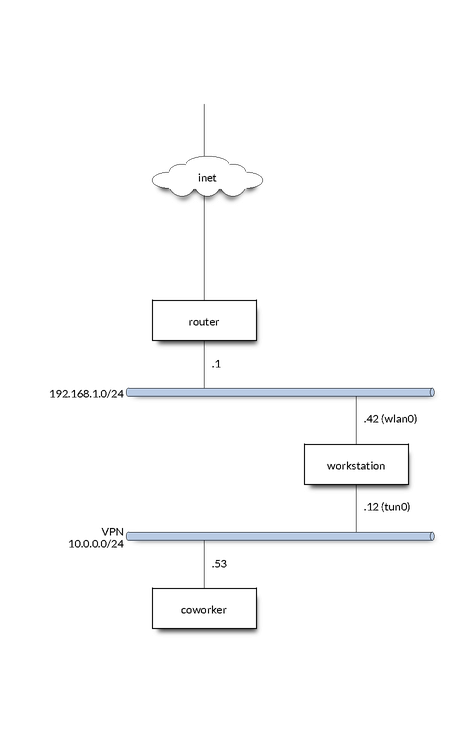
Eventually I’ll have to update this for nftables since iptables is being phased out, but I think it’ll be around long enough to still be worth the discussion here. Every consultant should know some generic iptables functionality, if only just for setting up your laptop’s firewall rules to block all incoming traffic. One of the primary things you’ll be using iptables for when hacking together some networking is Network Address Translation (NAT). As an example, say you’re on a VPN (interface tun0, subnet 10.0.0.0/24) with your coworker, and you have a router on your personal network (interface wlan0, subnet 192.168.1.0/24) that you want to give them access to. Your IP in the VPN is 10.0.0.12, your coworker is 10.0.0.53, the router is 192.168.1.1, and your IP on wlan0 is 192.168.1.42.
It only takes a few iptables commands to set this up:
# Change the destination IP

iptables -t nat -I PREROUTING -i tun0 -d '10.0.0.12' -s '10.0.0.53' -j DNAT --to-destination '192.168.1.1'

# Allow forwarding to happen

iptables -I FORWARD -o wlan0 -i tun0 -m conntrack --ctstate NEW -j ACCEPT
iptables -I FORWARD -m conntrack --ctstate ESTABLISHED,RELATED -j ACCEPT

# Change the source to our IP on the local network so we can get packets
# back.

iptables -t nat -I POSTROUTING -o wlan0 -j SNAT --to-source 192.168.1.42

# Can also MASQUERADE instead which is simpler and does more or less the
# same thing
# iptables -t nat -I POSTROUTING -o wlan0 -j MASQUERADE
One gotcha, for this to work:
$ cat /proc/sys/net/ipv4/ip_forward
Must return 1, if it doesn’t, write 1 to that file.
These iptables commands are basically saying, in plain English:
Inspect all input coming in the
tun0interface. If the input source IP is10.0.0.53(coworker) and it is sent to10.0.0.12(me), translate the destination to192.168.1.1. Allow new forwards fromtun0towlan0and track them, then allow all tracked connections to continue. Finally, change the source address of all packets leavingwlan0to our IP on the interface.
This, for all practical purposes, turns your host into the router on the VPN. Every port on the router is accessible by hitting the same port on your host. Neat. If you don’t want that and only want a specific port, you can specify --dport and a port in --to-destination, like so (allowing SSH for example):
iptables -t nat -I PREROUTING -i tun0 -d '10.0.0.12' --dport 22 -s '10.0.0.53' -j DNAT --to-destination '192.168.1.1:22'
iptables VM transparent proxy
iptables can also be used for setting up a transparent proxy for a VM. For example, imagine a setup where you have a VM with “host only” networking on interface vmnet1 with eth0 as your host’s gateway interface. Your host on vmnet1 is 192.168.100.1 and the VM is 192.168.100.100.
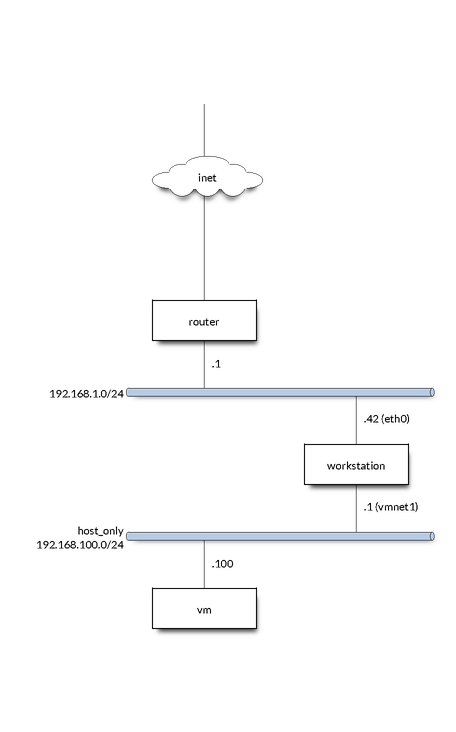
Giving the VM internet is as simple as:
# Allow traffic from VM, this is important if you want to start transparently
# proxying traffic elsewhere
iptables -I INPUT -i vmnet1 -s 192.168.100.100 -j ACCEPT

# Allow forwarding
iptables -I FORWARD -i vmnet1 -o eth0 -m conntrack --ctstate NEW -j ACCEPT
iptables -I FORWARD -m conntrack --ctstate ESTABLISHED,RELATED -j ACCEPT

# Change the source to our IP on the local network so we can get packets
# back.
iptables -t nat -I POSTROUTING -o eth0 -j SNAT --to-source 192.168.100.1

# Can also MASQUERADE instead which is simpler and does more or less the
# same thing
# iptables -t nat -A POSTROUTING -o "$GWIFACE" -j MASQUERADE
Now if you want to transparently proxy all HTTP/HTTPS traffic:
iptables -t nat -N HTTP_PROXY
iptables -t nat -I HTTP_PROXY -p tcp -j DNAT --to-destination "$PROXYIP:$PROXYPORT"
iptables -t nat -I PREROUTING -p tcp -i vmnet1 -s 192.168.100.100 --dport 80 -j HTTP_PROXY
iptables -t nat -I PREROUTING -p tcp -i "$IFACE" -s 192.168.100.100 --dport 443 -j HTTP_PROXY
Note if you set up the VM with a host only interface you likely need to add a default route (to use 192.168.100.1 in this case) and set the DNS server.
SSH
SSH is not just a way to get a terminal, it also has some awesome networking capabilities and I’d recommend checking out the man page for all the cool stuff you can do, but here I’ll talk about a few important things:
DynamicForwardor the-DflagRemoteForwardor the-RflagLocalForwardor the-LflagProxyJumpor the-Jflag
When talking about SSH features, we’ll always talk about the local host (you) and the remote host (the host running the SSH server you’re connecting to). Another useful feature of SSH that I won’t go into here is the ControlMaster config option and other related options which can help keep an SSH session alive and allow multiple sessions to use a single session. This is nice when using ProxyJump when you have to authenticate at each jump for example.
DynamicForward
DynamicForward (-D) is used to open a port on your local machine that acts as a SOCKS server. Essentially what this means is that if you are using a SOCKS aware client (or redsocks if you dare) you can make a request on your local host using SSH’s socks server and it will send the request from the remote host.

As a concrete example:
ssh -D 127.0.0.1:31337 REMOTEHOST
This will open your SSH session and start a SOCKS server on 127.0.0.1:31337. You can use this SOCKS server with tools like Burp, mitmproxy, and curl. For example with curl:
curl --socks5 127.0.0.1:31337 https://cnn.com
This will send the HTTP request over the SOCKS proxy to the remote host which will then be the source of the HTTP request. This can be very helpful for accessing services on internal networks from your local machine. You’ll often want to do this when you want to use a tool you have installed on your local machine but not on a jumpbox in a client’s local a network.
RemoteForward
RemoteForward (-R) is used to open a port on the remote host and forward that traffic to your local host. Essentially what this is doing is running a TCP (or Unix socket) server on the remote host and just trivially forwarding all traffic back to you.

As a concrete example, say you have an HTTP server running on your local host and want to open it to the world via an intermediate remote host:
ssh -R 8080:127.0.0.1:80 REMOTEHOST
Let’s say the remote host is 8.8.8.8 and has port 8080 open to the internet:
curl http://8.8.8.8:8080
will then send an HTTP request to the remote host and since that port is a simple TCP server started by the SSH server on the remote host, it will be forwarded back to 127.0.0.1:80 on your local host. You’ve essentially put a single port from your local host onto the internet. I use this a lot when exploiting SSRF issues or opening reverse shells since it’s always nicer to work on your own computer with all the tools you’re familiar with.
LocalForward
LocalForward (-L) is basically the reverse of RemoteForward: it starts a server on your local host that forwards traffic to the remote host. For example, say you’re working on a client’s server that has a service listening on 10.1.2.5:5671, but you can’t actually route to 10.1.2.5 because it is on a different interface.
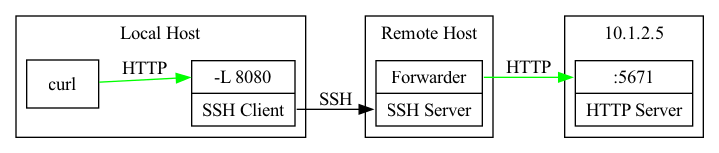
You can use SSH to set up a tunnel to this service with:
ssh -L 8080:10.1.2.5:5671 REMOTEHOST
This will run a TCP server on your local host at port 8080 that is tunneled to 10.1.2.5:5671 on the remote host. You can now interact with the service from your local host as if you were on the remote host, allowing you to use all of your favorite tools on your localhost.
ProxyJump
ProxyJump (-J) basically chains SSH connections together. As an example, say you are working on a client’s network through a jumpbox at 10.2.4.5, and you want to SSH into a box on the network at 10.3.24.42. You can’t reach 10.3.24.42 from your local host, so a naive approach would be to manually ssh into your jumpbox at 10.2.4.5 and then, from there, ssh into the box at 10.3.24.42:
localhost$ ssh -i KEY jumpboxuser@10.2.4.5
jumpbox$ ssh -i KEY targetuser@10.3.24.42
targetbox$
But that’s kinda clunky and it’ll be a bit tedious to use all the cool SSH forwarding features while doing that.
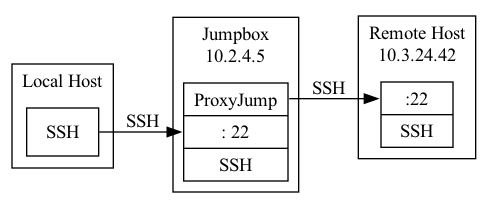
This can be solved with ProxyJump (-J):
localhost$ ssh -J jumpboxuser@10.2.4.5 targetuser@10.3.24.42
targetbox$
I almost never use -J and instead use ProxyJump in my ssh config file (~/.ssh/config) because it allows configuring parameters for each host in the chain. ProxyJump is not limited to a single host! You can jump through multiple hosts and all of your -R, -L, and -D command line options will work: it’s kinda amazing.
socat
socat is an amazing tool. I can’t describe all of the things socat can do in this writeup so I highly recommend man socat, but let me go over a few things I’ve used socat for that you might not expect would be so easy.
One of the cooler uses for socat is to allow access to a serial port via a TCP server. As an example, say you have a serial port connected to /dev/ttyUSB0 and want to open it up to a coworker via a VPN (interface tun0 subnet 10.0.0.0/24). Your IP on the VPN is 10.0.0.12.
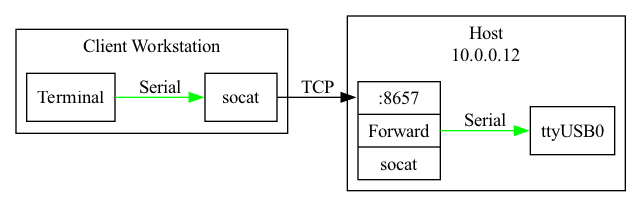
To send TCP traffic to this serial port all you need to do is:
socat 'TCP4-LISTEN:8657,nonblock=1,fork,nodelay,reuseaddr,range=10.0.0.0/24,bind=10.0.0.12' '/dev/ttyUSB0,rawer,b115200,nonblock=1'
This command opens a TCP server on 10.0.0.12:8657 and forwards what it receives to the serial port (baud rate 115200). Since I typically have a restrictive firewall setup I need to also accompany this with an iptables rule:
# iptables -I INPUT -p TCP -s 10.0.0.0/24 -d 10.0.0.12 --dport 8657 -j ACCEPT
Now your coworker just needs to run:
socat TCP4:10.0.0.12:8657 '-,rawer,escape=0x1d'
and they will be able to use the serial port remotely! (This sets Ctrl + ] as the escape)
Another thing I often use socat for is to set up a TLS listener and forward it to a normal TCP server so I don’t have to deal with TLS in the server I’m writing:
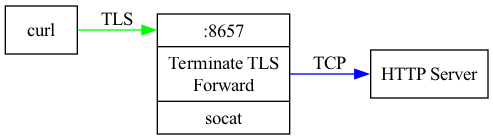
socat OPENSSL-LISTEN:8657,nonblock=1,fork,nodelay,reuseaddr,cert=/path/to/cert_and_key.pem TCP:127.0.0.1:80
Some other fun things you can do with socat:
- Translate IP6 to IP4
- Trigger a local program to run with an incoming TCP connection
- Replacement for the full iptables NAT functionality to forward traffic to specific ports
There is a ton you can do with socat and if the other tools aren’t suiting your purposes, chances are socat can do what you need.
nc
nc is nice for quickly setting up a TCP listener. I’ll often use this just to see what an SSRF is sending me or to set up a listener for a reverse shell. You can also make outgoing requests with nc, and in combination with printf this can often be an easy way to send some quick binary data to a target server.
To set up a TCP listener with nc it is as simple as:
nc -l LISTENADDR LISTENPORT
When using it just to see if I receive a connection I like to add some -v flags. If -l isn’t specified, nc will instead connect:
nc REMOTEADDR REMOTEPORT
You can pipe data into nc when connecting to send whatever you want to the remote target.
adb
adb is showing up in more and more places and it provides a lot of functionality. adb reverse is simliar to RemoteForward with ssh and adb forward is similar to LocalForward with ssh. adb can also run as a TCP server on the target device and other networking tools can be used to give access to this.
Some common use cases
What follows are some common ways I use these tools, once again, this may not be the optimal way to do these tasks, but they work and only require some basic knowledge of the tools outlined above.
SSRF Check
Say you’ve found what you believe to be an SSRF on your target and you want to see what it sends. There are various tools to handle this, and I often use Burp intruder, but you can also do this very simply with a server on the internet, ssh, and nc. Here is how:
localhost$ ssh -R 8080:127.0.0.1:8080 MYSERVER
localhost$ while true; do printf 'HTTP/1.1 200 OK\r\n\r\n' | nc -l 127.0.0.1 8080; done
This uses SSH to open our local port to the internet via RemoteForward and then uses nc to create the simplest HTTP server you can come up with. Sometimes you may need to open port 80 on the remote host and you’ll get a failure since it’s a low port. No worries:
localhost$ ssh -R 8080:127.0.0.1:8080 MYSERVER
remotehost$ sudo socat TCP4-LISTEN:80,nonblock=1,fork,nodelay,reuseaddr,user=nobody,group=nogroup TCP:127.0.0.1:8080,nonblock=1,nodelay
localhost$ while true; do printf 'HTTP/1.1 200 OK\r\n\r\n' | nc -l 127.0.0.1 8080; done
This uses socat on the remote host to forward incoming TCP connections on 8080 to port 80.
Reverse shell
Similar to the SSRF check, tunnel a reverse shell from an internet facing server to your local host.
localhost$ ssh -R 12345:127.0.0.1:12345 MYSERVER
localhost$ nc -v -l 127.0.0.1 12345
Note that this typically gives you a kinda crappy reverse shell. If you have some other utilities on the host there are ways to get a PTY for your reverse shell and make it work kinda nicely. Check out this great blog post for some ways to upgrade your reverse shell.
Allow someone on a VPN to use your SOCKS proxy
localhost$ ssh -D 10.0.0.12:1080 JUMPBOX
localhost# iptables -I INPUT -d 10.0.0.12 --dport 1080 -s 10.0.0.42 -j ACCEPT
Allow someone on a VPN to use adb on a target device
VPN: tun0 subnet 10.0.0.0/24
Local network: wlan0 subnet 192.168.1.0/24
You on VPN: 10.0.0.12
Coworker on VPN: 10.0.0.42
You on local network: 192.168.1.12
Target device on network: 192.168.1.30
localhost$ adb tcpip 5035
localhost# iptables -t nat -I PREROUTING -i tun0 -p tcp -d 10.0.0.12 -s 10.0.0.42 --dport 5035 -j DNAT --to-destination 192.168.1.30:5035
localhost# iptables -I FORWARD -o wlan0 -i tun0 -m conntrack --ctstate NEW -j ACCEPT
localhost# iptables -I FORWARD -m conntrack --ctstate ESTABLISHED,RELATED -j ACCEPT
localhost# iptables -t nat -I POSTROUTING -o wlan0 -d 192.168.1.30 -j SNAT --to-source 192.168.1.12
# OR
localhost# iptables -t nat -I POSTROUTING -o wlan0 -j MASQUERADE
This sets up adb to use a TCP server instead of a USB connection and then uses iptables to NAT traffic. This can also be done with socat:
localhost$ adb tcpip 5035
localhost$ socat 'TCP-LISTEN:5035,reuseaddr,nonblock=1,nodelay,range=10.0.0.42/32,bind=10.0.0.12' 'TCP:192.168.1.30:5035,nonblock=1,nodelay'
I prefer the iptables method, but both will work just fine.
Run a VPN in a VM
I never run client VPNs directly on my host but instead isolate them in a VM. Since Windows also supports SSH, this can be really helpful. Basically just set up the VPN in the VM and then you can set up a SOCKS proxy to the VM and use that proxy for most of your tools.
ssh -D 127.0.0.1:1080 VM
Most tools can be configured to use a SOCKS proxy, but if they can’t, there is always redsocks which is an awesome tool.
Transparently forward traffic to Burp from a rooted Android phone
I use this one all the time since I typically do my MITM setups on a rooted Android device. It is a very clean way to deal with MITMing Android application traffic.
localhost$ adb reverse tcp:9090 tcp:9090
phone# iptables -t nat -I OUTPUT -p tcp -m owner --uid-owner u0_aXXX -j DNAT --to-destination 127.0.0.1:9090